Pulsar App
User Guide
The Pulsar App is a powerful mobile solution designed to streamline sales, returns, inventory management, and business analytics for merchants. Additionally, users can leverage SoftPOS as a full-fledged POS solution directly through their smartphones. This capability allowing them to operate with greater flexibility and without being confined to a fixed location. It significantly facilitates mobile trading, courier, and delivery services by transforming a smartphone into a portable POS. The key screens of the SoftPOS closely resemble traditional POS interfaces, simplifying the transition and usage for businesses already familiar with POS operations.
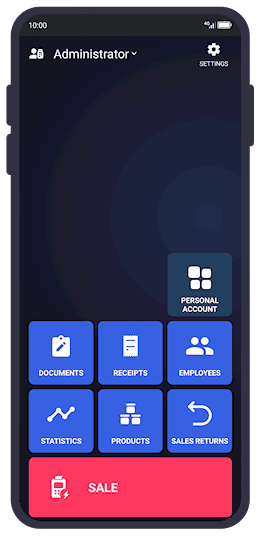
Main menu provides quick access to core operations: Sales, Returns, Inventory, and Analytics.
Key Features
🔸Authorization: Secure login and role-based access.
🔸Payment Methods: Support for cash and Tap On Phone (NFC) payment options.
🔸Product Management: Create, edit, and organize products and services.
🔸Sales & Returns: Efficiently manage transactions and refunds.
🔸Inventory Tracking: Monitor stock levels and manage goods.
🔸Statistics & Analytics: Track sales performance, revenue, and payment methods.
SoftPOS Advantages
🔸Mobility: No need for additional hardware; your smartphone becomes your POS terminal.
🔸Flexibility: Ideal for businesses that are dynamic or location-independent.
🔸Ease of Use: User interface mirrors traditional POS systems, making it easy for employees to adapt quickly.
🔸Efficiency: Suitable for couriers, home deliveries, outdoor sales, and pop-up shops, streamlining operations on the go.
Authorization
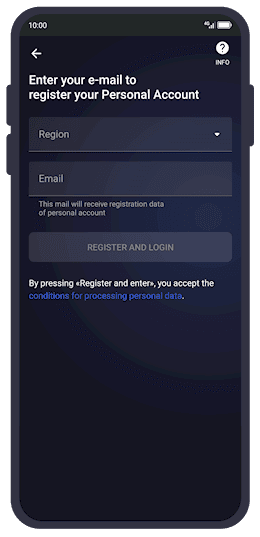
Register your Personal Account by selecting a region and entering your email address.
Steps to Authorize
- 🔹Select Language: Choose your preferred language. You can change this selection later in the settings.
- 🔹Verify Phone Number: Enter your phone number and verify it by entering the One-Time Password (OTP) sent via SMS.
- 🔹Employee and Role Selection: Select your employee profile and the appropriate role for an existing account, or complete onboarding by entering the required details for a new account.
📌 Note: Please ensure you enter a valid email address, as login credentials for the merchant's personal account will be sent there.
Payment Method Setup
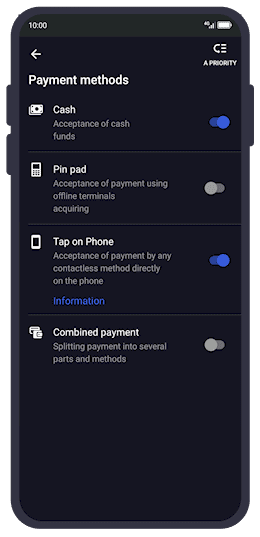
Adjust app settings, payment methods, company details, and activate Tap On Phone (NFC) payments.
Settings Overview
- 🔹Fast Sale Mode: Enable for faster transactions without needing to navigate the product catalog.
- 🔹Company Information: Edit and update company details.
- 🔹Payment Methods: Choose between cash, Tap On Phone, and other available options.
- 🔹Language & Appearance: Customize the app’s language and the way the product catalog is displayed (list, large tiles, or small tiles).
- 🔹Feedback: Submit feedback directly through the app.
- 🔹App Authenticity Verification: Ensure the app's integrity by verifying its authenticity, checking for tampering, and confirming it's sourced from a trusted developer, psr-it.com. This process involves techniques like signature validation, checksum comparison, and secure distribution channels.
Tap On Phone Setup
- 🔹Request Connection: Fill out a form with company data to request Tap On Phone (NFC) payment capability.
- 🔹Approval Process: Wait for approval, which typically takes some time.
- 🔹Activation: Once approved, enter the email and confirmation code to activate Tap On Phone.
- 🔹Toggle On/Off: Use the toggle switch to enable or disable Tap On Phone for transactions.
Product Management

Create or edit products with detailed attributes including price, barcode, and tax settings.
Creating a Product or Service
Enter the following information:
- 🔹Name (required): The product's name should be descriptive and easy to identify.
- 🔹Unit of Measurement: The unit in which the product is measured (e.g., piece, kilogram, liter).
- 🔹Quantity: The number of units available or being added.
- 🔹Product Code: A unique identifier for the product, often used in internal systems for tracking.
- 🔹Vendor Code (if applicable): A reference code provided by the supplier or manufacturer for the product.
- 🔹Barcode (manually entered, generated, or scanned): A unique barcode used to identify the product. Can be input manually or generated automatically.
- 🔹Selling Price: The price at which the product will be sold to customers.
- 🔹Purchase Price: The price at which the product is purchased from the supplier.
- 🔹Price Without Tax: The price of the product before any applicable taxes are applied.
- 🔹Description: A detailed description of the product, providing additional information about its features or usage.
- 🔹Type: Specify whether the item is a Product or a Service. Choose "Product" for tangible goods or "Service" for intangible offerings.
- 🔹Tax Rate: The applicable tax rate for the product, based on local laws and regulations.
💡 Tip: Once all details are entered, save the product to the catalog. A notification will confirm the successful addition.
Creating Product Groups
- 🔹Add Group: Select the "Group" option when adding a new entity to the catalog.
- 🔹Group Details: Enter the group name and select a subgroup (if applicable).
- 🔹Save Group: Save the group to the catalog. You can then add products to the group or delete the group if needed.
Sales

Perform sales by manually selecting products, scanning barcodes, or using free-price entry with flexible discount options.
Manual Product Selection
- 🔹Start Sale: Click the "Sale" button on the main menu.
- 🔹Add Product: Click the "add" button and select "Product" to choose from the catalog.
- 🔹Select Products: Add one or more products to the sale.
- 🔹Edit Price/Quantity: Click on a product in the list to manually adjust the price or quantity.
- 🔹Apply Discounts: Apply a percentage or fixed-amount discount with a simple swipe left on a product or service. The app will automatically update and recalculate the total amount in real time.
- 🔹Proceed to Payment: Choose between cash or Tap On Phone to complete the transaction.
Free Price Sale
- 🔹Select Free Price: Choose the "Free Price" option.
- 🔹Enter Product Details: Input the product name, price, and quantity.
- 🔹Confirm Sale: Confirm the product creation and proceed with the sale as described in the manual selection process.
Barcode Sale
- 🔹Select Barcode: Choose the "Barcode" option.
- 🔹Scan Barcode: Use the device’s camera to scan the product barcode.
- 🔹Confirm Product: Confirm the product addition and complete the sale.
Returns
Return Process
- 🔹Access Returns: Go to the "Sales Returns" section.
- 🔹Select Receipt: Choose the receipt for the return.
- 🔹Select Products: Select one, several, or all products from the receipt for return.
- 🔹Process Return: Complete the return using the original payment method (cash or Tap On Phone).
- 🔹Confirmation: Once the return is successful, the receipt will be marked as disabled in the system.
Receipts
Receipt Information
- 🔹Transaction Amount: Total amount of the sale or return.
- 🔹Products: List of products included in the transaction.
- 🔹Transaction Type & Payment Method: Indicates whether it was a sale or return and the payment method used.
- 🔹Receipt Number & Date: Unique identifier and date of the transaction.
Receipt Filtering
- 🔹By Period: Filter receipts by a specific time frame (up to 31 days).
- 🔹By Transaction Type: Filter by Sale or Sale return.
Additional Features
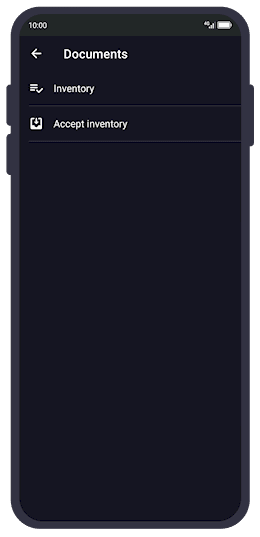
Conduct accurate inventory management by generating product quantity reports.
Inventory Management
- 🔹Select Products: Choose products for inventory from the catalog.
- 🔹Enter Quantity: Input the actual quantity of the product.
- 🔹Generate Report: Create an inventory report for accounting or balance purposes.
- 🔹Update Catalog: The actual quantity will be updated in the product catalog.
Statistics & Analytics
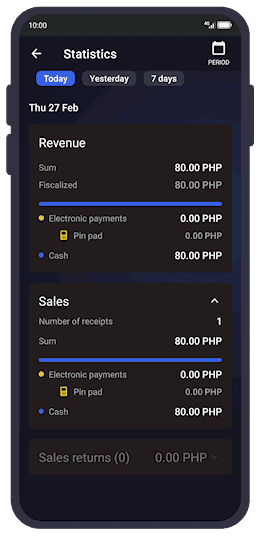
Analyze business performance through detailed statistics on revenue, payments, and transaction frequency.
- 🔹Total Revenue: Track overall revenue generated.
- 🔹Sales & Returns: Monitor the number of sales and returns.
- 🔹Payment Methods: Analyze which payment methods are most frequently used.
- 🔹Number of Receipts: Displays the total count of receipts issued during the selected time period, providing insights into transaction frequency and store traffic.
- 🔹Filtering: Filter data by specific time periods for detailed analysis.
The Pulsar App is a powerful tool for merchants, offering a wide range of features to manage sales, inventory, and business performance efficiently.
With its user-friendly interface, robust functionality, and support for multiple payment methods, including the transformative SoftPOS capability, Pulsar App is an ideal solution for small and medium-sized businesses looking to streamline their operations, enhance customer service, and grow without limitations.