Terminal Management System
User Guide
The Terminal Management System (TMS) is an advanced platform for managing, monitoring, and administering POS terminals used in retail, hospitality, and other transaction-based environments. This system allows you to:
🔸Efficiently control your network of POS terminals.
🔸Ensure software is up to date and devices are secure.
🔸Manage employee access and optimize business processes.
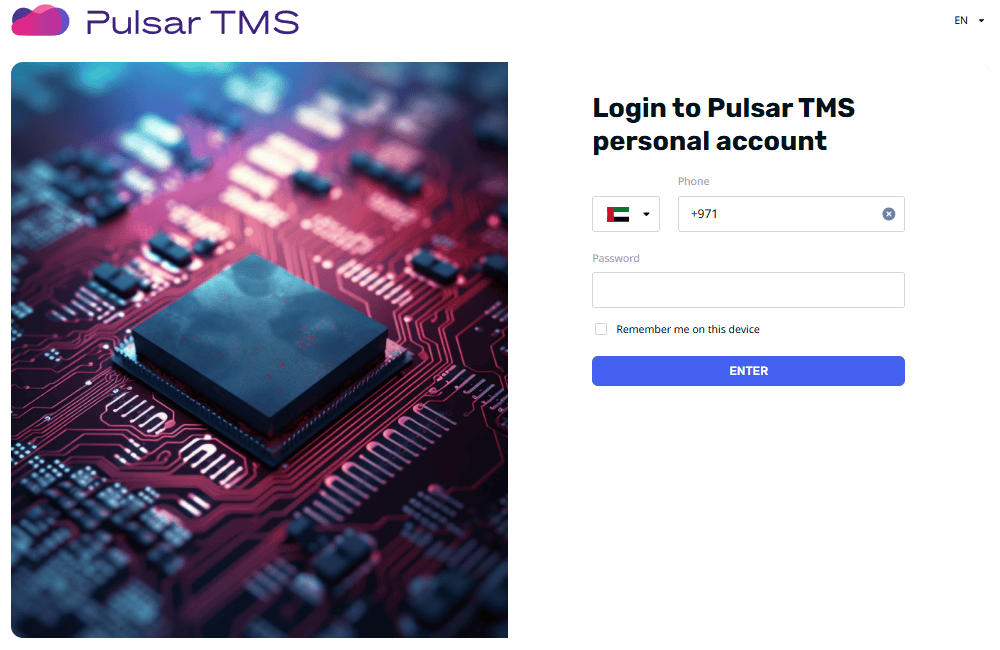
Please contact mailto:support@psr.ae to obtain your main credentials for accessing the system.
System Functionalities
TMS comprises five primary functional areas:
Terminal Management
- 🔹Organize POS terminals into customizable groups based on location, function, or other business criteria.
- 🔹Monitor terminal performance metrics and system health in real time.
Updates Management:
- 🔹Efficiently manage firmware and software updates for all terminals.
- 🔹Maintain compliance with security standards, reduce vulnerabilities, and ensure optimal performance.
Configuration / Acquiring
- 🔹Manage payment systems and configure payment settings on POS terminals.
- 🔹Define supported cards and EMV certificates for each payment system.
Tools / Applications Management
- 🔹Centrally deploy, update, and uninstall applications on all connected terminals.
- 🔹Ensure all devices are equipped with the latest software, enhancing security and consistency.
Staff Management
- 🔹Provide granular control over access rights for different system functionalities.
- 🔹Monitor and audit employee activities while ensuring secure access.
Working with Groups
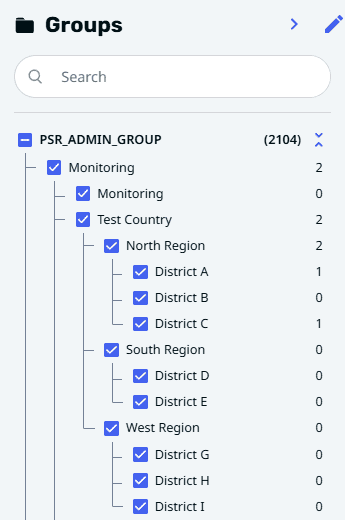
The Groups section is located on the left side of the TMS page. It allows you to:
- 🔹Create and manage groups and subgroups to organize various system elements.
- 🔹View data only for the groups assigned to you, providing a personalized view tailored to your responsibilities.
Creating and Editing Groups
- 🔹Click the
 icon in the upper right corner of the Groups frame to create a new group or edit an existing one.
 - 🔹Click the
 icon to add a subgroup or the icon to rename a group.
 - 🔹Click the
 icon to delete a group or subgroup.
 - 🔹Press the
 icon to save the changes.
Viewing Groups
- 🔹Select a group from the list to view all associated terminals and their specifications.
Terminal Management
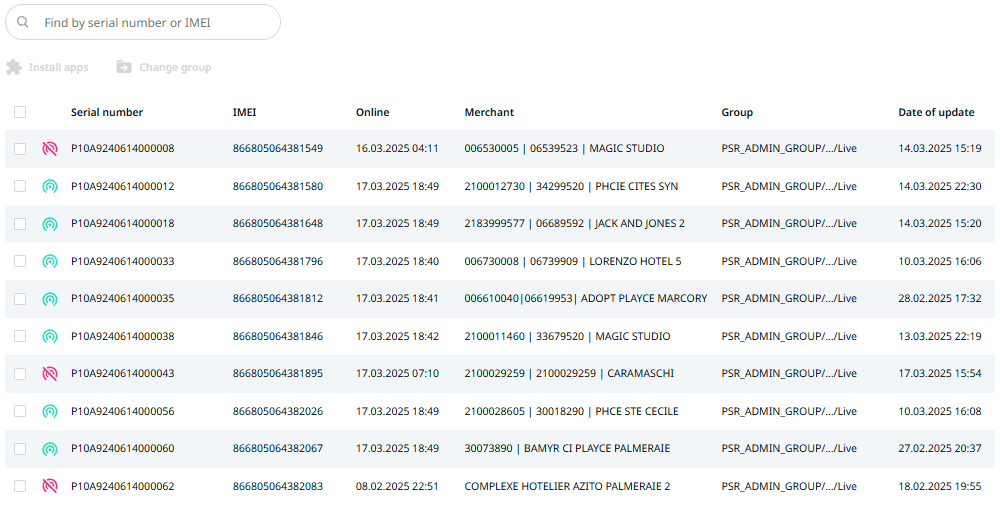
A list of terminals is displayed with an indicator showing whether each terminal is online  or offline
  , enabling quick assessment of network status.
The following information is available:
- 🔹Serial Number: Unique identifier of the terminal.
- 🔹IMEI: International Mobile Equipment Identity number.
- 🔹Online: The last date and time the terminal was online.
- 🔹Merchant: The merchant associated with the terminal.
- 🔹Group: The group to which the terminal is assigned.
- 🔹Date of Update: The last date when the terminal was updated.
Select the terminal to open additional options:
- 🔹
 : Start the firmware update process for selected terminals.
 - 🔹
 : Install applications directly on the POS using the terminal interface.
 - 🔹
 : Optionally reassign the terminal to another group for better organization.
Terminal Card
The Terminal Card is a core feature of the TMS, offering detailed information and controls for managing individual POS terminals. It enables users to monitor terminal status, manage installed applications, access geolocation data, and perform administrative tasks such as changing terminal groups, initiating remote access, and downloading logs. The Terminal Card interface presents key details about the selected terminal, including its model, IMEI, software version, performance metrics, and more.
Terminal Information
The top section of the Terminal Card displays basic details about the terminal:
- Terminal ID: A unique alphanumeric identifier for the terminal.
- Group: The group to which the terminal belongs (e.g., company structure, department).
Actions
- 🔹: Allows the user to reassign the terminal to a different group.
- 🔹
 : Enables direct remote control of the terminal for troubleshooting or configuration.
 - 🔹
 : Downloads detailed logs from the terminal for further analysis.
General Information
This section provides detailed specifications and status indicators for the terminal:
| Parameter | Description |
|---|---|
| Model | Terminal model type (e.g., P10) |
| IMEI | Unique identifier assigned to the terminal for network registration |
| SP version | Installed service pack version (if available) |
| Date on the tablet | Date and time on the terminal device |
| Last update date | Date when the terminal was last updated |
| Online | Last recorded online status of the terminal |
| Added | Unique code assigned to the terminal upon registration |
| Merchant | Merchant information (e.g., merchant ID, name) |
| CPU temperature | Current processor temperature (in °C) |
| CPU loading | Current processor load (in %) |
| Battery temperature | Current battery temperature (in °C) |
| Battery charge | Current battery charge level (in %) |
| Storage | Amount of used storage out of total available space |
Geolocation
The geolocation section provides the terminal's physical location on a map for easy identification and monitoring.
- 🔹Address: The current location of the terminal (e.g., city, street)
- 🔹Map: A Google Maps preview showing the terminal's current location.
Installed Applications
The installed applications section lists all applications currently installed on the terminal, along with their details.
| Name | Package Name | Operator | Date Installed |
|---|---|---|---|
| App 1 | Application package name | Operator username | Installation date |
| App 2 | Application package name | Operator username | Installation date |
Options:
- 🔹Click on to install new applications directly from the TMS interface.
- 🔹Click on to remove an installed application.
Transactions
The Transactions section in the TMS provides a centralized interface for viewing and analyzing all payment and cancellation operations performed via POS terminals. This section is useful for support teams, supervisors, and financial auditors to investigate transaction flows, verify outcomes, and resolve potential issues.
Filter and Search Panel
Users can filter transaction records using a wide range of parameters:
- 🔹Card Number: Full or masked number of the payment card used.
- 🔹Merchant: Merchant name or ID where the transaction occurred.
- 🔹Terminal: Terminal ID that processed the transaction.
- 🔹IMEI: IMEI number of the terminal device.
- 🔹STAN: System Trace Audit Number – a unique session number generated by the terminal.
- 🔹RRN: Reference Retrieval Number – global transaction identifier across systems.
- 🔹Response Code: Code returned by the acquiring system indicating transaction result.
- 🔹Authorization Code: Code provided by the issuing bank authorizing the transaction.
- 🔹Type of Operation: Transaction type, such as Payment, Cancellation, or Refund.
- 🔹Date Range: Filter by time period (custom dates or presets: Today, Week, etc.).
Transaction List
Filtered results are displayed in a table with the following columns:
| Column | Description |
|---|---|
| Date | Date and time when the transaction was processed. |
| Type of Operation | The nature of the transaction (e.g., Payment, Cancellation). |
| Card Number | Masked number of the card used in the transaction. |
| Terminal | ID of the terminal that processed the transaction. |
| Merchant | Name or ID of the merchant where the transaction occurred. |
| STAN | System Trace Audit Number – terminal-generated session ID. |
| RRN | Reference Retrieval Number – system-wide transaction ID. |
| Authorization Code | Code confirming that the transaction was authorized by the issuer bank. |
| Status | Final outcome of the transaction (e.g., Approved, Declined). |
| Amount | Monetary value of the transaction. |
| Currency | ISO currency code of the transaction (e.g., PHP, XOF). |
Transaction Card
This is a detailed view of a single transaction. It includes technical and financial information that can help identify errors, verify data, or assist during support.
Here is a full table of parameters displayed in the Transaction Card:
| Parameter | Description |
|---|---|
| RRN | Reference Retrieval Number – unique identifier of the transaction across systems. |
| Status | Final status of the transaction (e.g., Approved, Declined). |
| Date | Date and time when the transaction was processed. |
| Type of Operation | Transaction type (e.g., Payment, Cancellation, Refund). |
| Payment Type | Method used to complete the payment (e.g., By card (chip), Contactless). |
| Card Number | Masked card number used in the transaction. |
| Merchant | Name or identifier of the merchant involved in the transaction. |
| Terminals | Terminal ID used to process the transaction. |
| Issuing Bank | Card issuer or payment network (e.g., VISA, Mastercard). |
| Authorization Code | Code confirming bank approval of the transaction. |
| Response Code | Processor response code (e.g., 00 for success, 05 for decline). |
| STAN | System Trace Audit Number – unique number generated by the terminal. |
| Amount | Total value of the transaction. |
| Currency | Transaction currency. |
| Pincheck | Indicates whether PIN verification was required (if applicable). |
| Message | Optional message from the processor or issuer bank. |
Acquiring
The Acquiring section allows you to add and manage payment systems on POS terminals. This feature provides a centralized interface for configuring payment processing settings, including supported payment methods, EMV parameters, and certificates. Proper configuration ensures secure and efficient handling of payment transactions on each terminal. In the Acquiring section, you can configure Payment Systems and Organizations.
Payment Systems
To add a new payment system:
Click on Add Payment System. Fill in the following fields:
- 🔹Name: Enter the name of the payment system.
- 🔹Type: Select from available options (e.g., MC, Visa, UnionPay).
- 🔹RID: Enter the Registered Application Identifier.
- 🔹EMV TDOL: Provide the EMV Transaction Data Object List.
- 🔹EMV DDOL: Provide the EMV Dynamic Data Object List.
Save the settings to register the payment system.
To remove the payment system, press ![]() and confirm the deletion.
and confirm the deletion.
⚠️ Warning: Removing a payment system will immediately disable the associated payment functionality on the terminal.
Organizations
To add a new organization:
Click on Add Organization.
Fill in the following fields:
- Company Name: Enter the full name of the organization.
- Business Type (MCC): Specify the Merchant Category Code.
- MID: Enter the Merchant Identification Number.
Save the settings to register the organization.
Application Management
Click on a specific application to open its Application Card, where you can view its specifications, installation status, and settings.
Application Actions:
- 🔹Delete Application: Remove an application if it is no longer needed.
- 🔹Change Group: Reassign the application to a different group for better organization.
- 🔹Install on Terminals: Deploy the application to terminals associated with the selected group.
Steps to Upload a New Application
- 🔹Navigate to Application:
- 🔹Click the “Add Application” link on the left side of the page to open the detailed application addition page.
- 🔹Fill in Required Fields:
- Application Name: Enter the name that will be displayed to users.
- Groups: Select the group(s) for which the application will be available.
- 🔹Upload Application File: Upload the application’s .apk file using the provided upload option, ensuring it meets the specified requirements.
- 🔹Review and Submit: Review all details for accuracy and submit the application for processing.
Employee Management
The Employees section allows you to add, edit, and manage employee accounts within the system. You can define specific permissions and assign employees to groups, ensuring controlled access to different system functionalities.
| Field | Description | Example |
|---|---|---|
| Name | First name of the employee (required). | John |
| Last Name | Last name of the employee (required). | Doe |
| Phone | Employee's phone number (required). | +221 12 312 1111 |
| Employee's email address (required). | john.doe@example.com | |
| Permissions | Define the employee's access rights: | |
| Employee Management | Manage other employee accounts and permissions. | ✅ |
| PSR Admin | Grant full administrative access to the system. | ❌ |
| Group Management | Allow the employee to create and modify groups. | ✅ |
| Terminal Management | Allow the employee to manage terminal operations (includes four sub-options): | ✅ |
| Firmware/Updates Management | Manage firmware and software updates on terminals. | ❌ |
| Application Management | Manage installed applications on terminals. | ✅ |
| System Application Management | Manage system-level applications on terminals. | ❌ |
| Remote Management | Remotely control and configure terminal settings. | ✅ |
Adding a New Employee
- 🔹Click the “Add an Employee” link on the left side of the page.
- 🔹Enter the employee’s name, email, and other required contact information.
- 🔹Use the selectors in the Permissions section to define which areas of the TMS the employee can access, such as terminal or employee management.
- 🔹Specify the groups that the employee will have access to, aligning with their role and responsibilities.
- 🔹Review the entered information and submit the form. After submission, a message with the login credentials will be sent to the provided email.
⚠️ Warning: Removing an employee will immediately revoke all associated access rights.
The Terminal Management System offers all the necessary tools for centralized control over a network of POS terminals. It combines functionalities for grouping devices, managing applications, updating software, and controlling employee access, ensuring security, up-to-dateness, and high performance of your equipment.